VEXEL ART TUTORIAL FOR EVERYONE [Full Guide]
LEARN ABOUT MY VEXEL ART TUTORIAL
Vexel Art Tutorial using Adobe Photoshop CS6
Are you looking for a way on how vexel art should be done? Well, you're in the right place to know so much in such few minutes.
If you are passionate about art or just a curious reader, I am pleased to share you everything on this vexel art tutorial.
Either you use my preferred software which is adobe photoshop cs6 or any of your choice, dig in to my step by step tutorial on how to enter the door to vexel arts!
1. LINE ART - I usually start this kind of digital artwork with some kind of line art. I always love line arts since the start of my artwork post in my facebook page.
Line art is a drawing or illustration that consist of usually minimalist lines and curves to accent the whole subject. The line art that I did below gives some minimal details about the important structural parts of the subject.
The body must be perceived clearly so I gave it a generous outline but I made sure it isn't overpowering. Then, the face must have a really soft touch of the black accents. It is intended because we need the line art to be not overpowering for the coloring details. Lastly, I put a solid color to the hair in order for me to easily visualize what will it look like when I put color to the whole subject.
THE COLORING PART
The coloring part is where the fun begins. This is where you got to experiment a lot in order to satisfy your visual taste buds.
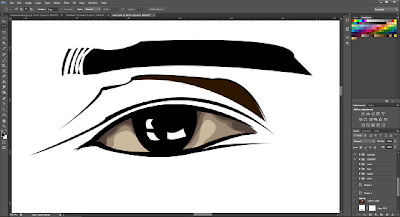
2. EYE - Artists tend to primarily prioritize the eye. They specifically do it because eye needs a good enticing amount of details. For my art style, I made it less complicated and just followed the flow of shadows.
Firstly, I put a base color that will be the basis of the succeeding colors that will serve as shadows. Shadows play an important role on every illustration. They create depth and a realistic form.
After giving it a base color, I applied succeeding layers of colored shadows. This will give a great flow of color that really sets the mood of the overall illustration.
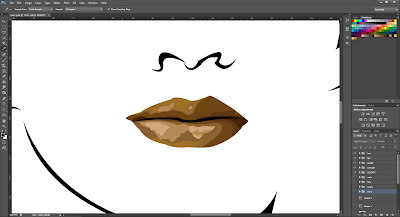
3. LIPS - Well, its the same for the lips. I made sure the light and dark parts must compliment each other.
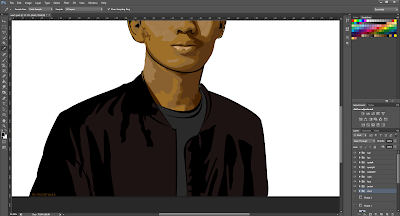
4. FACE & NECK - So, the rule I made in this vexel art tutorial is that I start from the darkest color up to the lightest one. Well, that's a no brainer. You already know it!
5. THE BODY - Put some minimalist highlights to the clothes or any accessory that might be on the body.
6. Also put some light shades on the HAIR. It is good to feel those flat solid color be somehow animated to life.
Finally, to finish this vexel art tutorial, I suggest you to put some geometric background behind where you can say "holy cow I am artistic!".


Comments
Post a Comment